Showing posts with label Cooking Basics. Show all posts

1.05.2011

Homemade Bagels--Tutorial

I've purchased countless bags of bagels at the grocery store. When I really splurge, I buy some from a bakery. The bagged bagels usually go stale before I can eat them all, and even then, they taste... well, bagged. The bakery bagels are expensive too! What's an on-a-budget mom to do? Make your own! Note--The pictures below are of a double batch (16 bagels), and of my favorite filling: chocolate chips.

Homemade Whole Wheat Bagels

3 cups all-purpose flour

1 cup whole wheat flour

1 Tbls sugar

1 1/2 tsps salt

1 Tbls vegetable oil

1 tsp cinnamon

1/2 tsp nutmeg

2 tsps instant yeast

1-1/2 cups of warm water.

Optional Fillings or toppings: Chocolate chips, raisins, blueberries, poppy seeds, sesame seeds, nuts, cheese, etc.

1) Mix all the ingredients in a bowl. Knead for 10 minutes. Then cover with a cloth and let rise for 20 minutes to one hour. (a longer rising time aids in flavor development.)

2) Cut the dough into 8 equal sized balls, (remember my pictures are a double batch)

then shape each one into a long snake. * If desired, you can add fillings now--a small handful to each ball. I like to roll mine into a long rectangle, then pour a little line of my fillings right down the middle. Then I pinch the edges together, sealing the filling in a nice tube in the middle of the bagel--ensuring I get a bit of goodness in every bite. I don't add fillings before kneading because the long knead will break them up or squish it strangely.* Keep your dough covered with a damp cloth while working so nothing gets dried out.

When ready, wrap the snake around your hand and clasp the ends together--squishing and kneading until it is a circle. Set each bagel aside, and when done with all eight, cover with a cloth. Let rise for another 20-40 minutes, or until puffy.
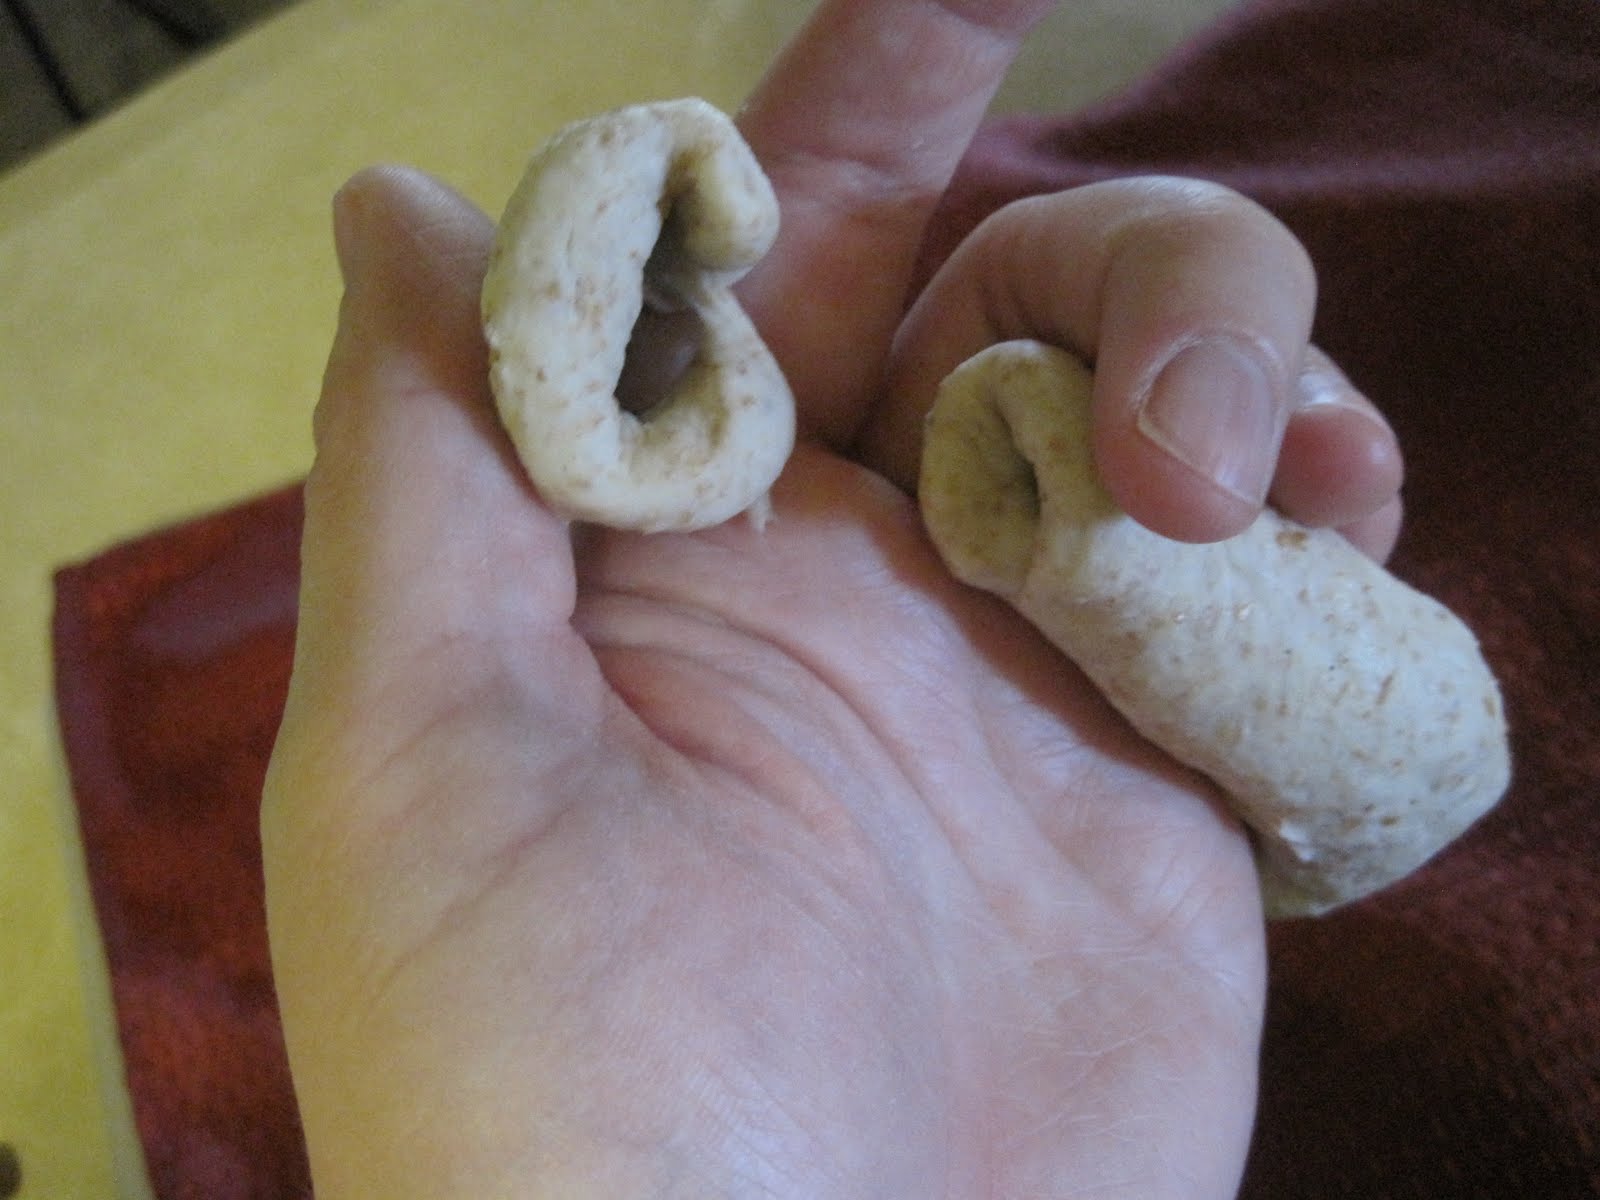
3) Pre heat your oven to 425. Bring a pot of water to a boil (wider is better, but it will need to be about four inches deep). Grease a cooking tray well, or better yet, use a silicone baking mat.

4) Boil the bagels! Drop them into the boiling water (it must be boiling, not just hot)--as many as will comfortably fit in the pot and not be stacked. My pot fits 3 at most. Boil for 1 minute per side (time it). When done boiling, move to the tray. *If you want toppings, you can first drop the hot, wet bagel on a plate of toppings.

5) Bake at 425 for 20 minutes, then cool on a cooling rack until you can't possibly stand it anymore! (or about 20 minutes.)

Filling ideas:

-Chocolate Chips (so yummy! The chocolate is all soft on the inside and reduces the need for lots of cream cheese. )

-blueberries

-raisins (add 1 tsp cinnamon to the dough before kneading)

-chopped nuts

-Cheddar or Asiago Cheese *this CAN be added before kneading, about 1/2 cup for the whole batch. Then you can top each bagel after the FIRST HALF of baking with more cheese.

-garlic and herbs for savory bagels

Topping Ideas:

-poppy seeds

-chopped nuts

-cinnamon sugar

-sesame seeds

-sunflower seeds


8.27.2010

Cooking Basics: The Freezer

Having a freezer is pretty common place in the United States. They're typically attached right to our refrigerator. Some of us are fortunate enough to own a larger freezer too. But are you taking yours to full advantage?

Keeping frozen juice, peas, and ice cubes isn't all a freezer can do. If you plan appropriately, it can be a staple to your food storage and keep you away from the grocery store (or fast food) every other day. Here's a few tips:

-Store a few entrees you have prepared, big enough to feed your family. On this blog I have put a few meals that freeze very well, and will continue to put more.
-Keep a variety of frozen vegetables and fruits. Frozen are much healthier than canned, and tastier too. You can either buy when the fruits and vegetables are in season and on sale and freeze yourself, or you can do what I do and buy pre-frozen.
-Meats, when properly wrapped and marked, freeze very well too. I save money when I buy ground beef and ground turkey on sale, in large bulk (5 pounds ore more). I portion it into meal-sized portions, wrap and mark, and freeze for later. It will last several months in my freezer. Same goes for roasts and turkeys--wait for those really good prices and take advantage!
-Cookie dough freezes fabulously! Have you ever made a batch of cookies that winds up with six dozen cookies and two people to eat them? If you freeze them in dough balls on a tray, then transfer to zip-lock bags in quantities of a dozen, you can cook off a few at a time and enjoy them over the course of a month or two. Plus, frozen dough balls make a great gift.

Remember to keep a list on the side of the fridge or freezer of what is in there, and cross it off when you use it. You really don't want to forget that you put in beautiful thick-cut pork chops that were $.99/lb , and find them three years later with two inches of frostbite on the outside. So sad. :(

Keep an eye out for all kinds of freezer meals and ideas, coming soon to a-dash-of-Lisa near you!

7.13.2010

Chocolate Covered Strawberries: Tips and Tricks

I once tried dipping some biscotti in chocolate. It was a disaster. After just a few minutes on the double boiler the chocolate seized up, burned, and I had no idea what I did wrong. It was several years before I worked up the courage to try dipping anything in real chocolate again. But recently I did, and had a lot of success. Here are my tips and tricks to making perfect chocolate dipped strawberries--not the cheapest treat in the world, but still not $20/lb, which is a pretty fair price at a chocolate shop. If you follow these instructions well, you should be able to avoid major chocolate disasters, and hopefully end up with something amazing to indulge yourself upon.

Chocolate Covered Strawberries

2 lbs strawberries
1 (12 oz) bag *milk chocolate chips--high quality (I like Ghirardelli)
2 Tbsp shortening

Before you start, please take a moment to read the instructions carefully and prep all your ingredients and tools. You will need 2 bowls, plenty of paper towels, and a tray lined with parchment/wax paper/silicone baking mat for cooling.

1) Boil 2 quarts of water. Meanwhile, wash strawberries and lay out on paper towels to dry thoroughly. Dry very, very well.
2) find 2 bowls, one that is glass or metal and can fit in the other comfortably without much wiggle room around the top, but still some space at the bottom for hot water to fit. I like to use a tall, deep bowl on the botttom and a shallower, wider bowl on the top. It allows plenty of space for lots of hot water without a lot of space for water to splash out.
3) Pour the boiling water into the bottom bowl and place the other inside (the inside bowl should be the glass or metal bowl with little to no wiggle room, but it should make contact with the water.)
4) Please, Please, PLEASE be careful to not allow even the tiniest drop of water into the inside bowl. Water will ruin the chocolate.
5) Add the chocolate chips and the shortening to the inside bowl, again being careful that no water gets in the bowl. Stir well and constantly until the chocolate melts.
6) Just when the chocolate is melted enough to be smooth, take off of the hot water. You don't want it to get too hot--it burns very easily--just hot enough to be liquidy. Keep the water standing by so that you can warm the chocolate a little more if it starts to cool down too much.
7) Hold the dry strawberries by the leaves and dip in the melted chocolate. Place on parchment paper, wax paper, or a silicone baking mat that is on a cookie sheet. Once all the strawberries are dipped, put in the refrigerator to harden for at least fifteen minutes.
7 part 2) If you want a decoration on the strawberries like nuts or drizzled dark/white chocolate, you can sprinkle nuts on to the chocolate before it goes into the fridge, or even do a double dip--dip strawberry first in the chocolate of course, then dip in chopped nuts or sprinkles before setting on the cooling surface. Drizzled chocolate is easy: just put about half a cup of dark or white chocolate chips into a zip-lock bag and place in the hot water, kneading it gently every minute, until it melts. Snip off a corner and squeeze the hot chocolate over the strawberries in a quick zigzag pattern. Then cool in the fridge.
Enjoy!

*If you want dark chocolate or white chocolate dipped strawberries, the method is exactly the same. You simply use dark chocolate chips or white chocolate chips instead of the milk chocolate.

Note: I've tried dipping other fruits in chocolate. Strawberries always work the best because the juice is well contained inside the berry. Other berries like raspberries or blueberries are also very good, but are a little harder to dip because they're small. Wetter fruits, like sliced apples or pineapple, tend to be too wet and the chocolate doesn't adhere well. Strawberries are the classic for a reason! But I'll bet kumquats would be phenomenal...

Lisa's Soap Box: Don't be afraid to get in the kitchen and make yourself something spectacular, like these chocolate dipped strawberries! It really is not that difficult; it simply requires a steady hand and self-confidence. Chocolate strawberries are a delicacy few of us ever purchase, let alone try to make--but we can enjoy delicacies like this a lot more often if we're willing to try making it ourselves. There's no need to pay the exorbitant service fees when you make your own food, and then you get to make it just the way you like. My husband loves the dark chocolate strawberries. I like mine with two kinds of chocolate. Don't even get me started on steak and how I think a restaurant's medium rare is really well done... By cooking the food myself, at home, I get exactly what I want at a phenomenal price. It's definitely worth the time and effort to learn for the great benefits!

6.23.2010

Chicken Cordon-Blue Casserole

This isn't quite as gourmet as my normal posts on here, but it was really tasty, really easy, and really fast. And, it can be easily frozen in its raw state and saved for some other day.

Chicken Cordon-Blue Casserole

1 1/2 pounds chicken tenders or chicken breasts, cut into 1" cubes
1/2 pound ham (ham steaks, ham slices, deli cut...however you've got it)
1/4 pound sliced swiss cheese
1/2 cup mayonnaise
3/4 cup sour cream
1 tsp garlic
1 tsp italian seasoning or dry basil leaves
1 roll ritz crackers
4 tbsp butter

1) Spray a casserole dish with cooking spray.
2) place chicken cubes in the bottom of the dish. Sprinkle with salt and pepper.
3) layer in the ham and the swiss cheese.
4) mix together the mayonnaise, the sour cream, garlic, and Italian Seasoning. Pour over the Swiss cheese.
5) Crunch up the ritz crackers and sprinkle on top. Dot with small slices of butter.
6) bake casserole at 350 degrees for 40 minutes, until bubbly and crunchy on top and chicken is cooked through.

Can be served with rice or baked potatoes, or plain.

*Note: if you want to freeze this casserole, line a 13x9 pan with heavy duty (hole-free) aluminum foil. Spray the inside of the foil and make the casserole according to directions, but instead of baking, put in the freezer. Once it is frozen solid, pop it out of the pan and wrap again with foil or plastic wrap. At baking time, put the casserole in its foil back in the pan you froze it in. Bake an extra 10-20 minutes if it was frozen when it went in the oven. Most casseroles can be frozen using this method--a great idea if you want to get ahead on your cooking or make a dinner for a friend.

6.07.2010

Homemade Barbecue Sauce

If you've ever looked at the ingredients list on your favorite bottle of BBQ sauce, you might have noticed in the first three ingredients is always at least one (usually two) types of sugar, including High Fructose Corn Syrup. Does it bother any one else that I'm paying four dollars for a sixteen ounce bottle of artificially flavored corn syrup? So after dabbling around a bit, I came up with a highly customizable recipe for Barbecue Sauce, and have vowed off store bought barbecue sauce forever.

Homemade Barbecue Sauce

1 onion
4 slices bacon
1 (big) can chopped or crushed tomatoes
2 tbsp Worcestershire Sauce
2 tbsp Balsamic Vinegar (or Red Wine Vinegar)
1 tsp salt
1/2 tsp pepper
1/2 tsp garlic
1/2 tsp oregano
1 tsp liquid smoke
1/2 cup brown sugar or molasses
~ other optional ingredients: 1/2 tsp red pepper flake, 2 tsp hot sauce, 1 red pepper or jalapeno pepper, 1 tsp cumin, 2 tsp smoked paprika, on and on and on...

1) Chop the bacon into small pieces. Also chop the onion and any other vegetables (grated carrot, red pepper, etc).
2) Cook the bacon in a large skillet until the fat renders out and bacon starts to crisp up. The bacon can stay in the sauce, or be removed for other yummy purposes.
3) Cook the onion/other veggies in the bacon fat for 3 to minutes until it starts to soften.
4) add the canned tomatoes and all other seasoning ingredients. Bring to a boil.
5) taste for seasoning. Add more sugar for sweeter, more vinegar for more tart, hot sauce for heat, liquid smoke for smokiness, until the sauce is the way you like it.
6) simmer until thick; probably about 10 to 20 minutes.

This sauce can be blended up at the end if you want it less chunky. Can be used as a meat marinade, as a topping on burgers or grilled meats. Try pouring 2 cups of BBQ sauce on a pork roast and cooking in the crock pot all day. Then shred the pork and put on hot biscuits for pork sandwiches! The possibilities are endless! See the next recipe on this blog for BBQ grilled pizza.

Ingredient clarification: Liquid Smoke is a product of the smoking process--they actually distill the vapor from hickory smoke and bottle it. It can be purchased in the BBQ sauce/Condiments aisle of your grocery store. A small bottle is all you need, and isn't too expensive. It's really tasty in all kinds of sauces and marinades. However, if you simply don't want to pay three bucks for liquid smoke, you can use smoked paprika (something I would HIGHLY recommend having in your house), or just leave it out. Be sure, though, that you get the real concentrate and not artificial. At my store they were the same price. I checked the ingredients, and one had carmel coloring and artificial flavors, one had hickory smoke concentrate. I'll bet you can guess which one I bought!

3.16.2010

Cooking Basics: The Knife Discourse

I have created a "Kitchen Knife Discourse" which I've uploaded on YouTube. Links below.

http://www.youtube.com/watch?v=qSfOhdPZj3Q


http://www.youtube.com/watch?v=bV_jd9edlw4

http://www.youtube.com/watch?v=ZP1LPGIkGmo


In the videos, I talk about how to find a good kitchen knife to use, the different styles of knives that are out there and what ones you should definitely have, and also how to properly care for your knives. I'm definitely thinking I'm up for an academy award for this amazing little piece. You should check it out. ;)

3.13.2010

Cooking Basics: Baking VS Cooking

Maybe you've heard the phrase, "I'm a cook, not a baker" or some similar rendition? Ever wondered what the difference was?

Baking involves mixing, usually using flour, putting things in a pan, and then putting them in the oven. Exact measurements are required. Baking very very rarely involves any other heat method than just the oven. Baking examples: Making rolls, cookies, or brownies.

Cooking involves a wider variety of ingredients and methods. Ingredients include vegetables, meats, and herbs. There is more tasting and less precise measuring. Cooking is what you use to prepare sauteed vegetables, grilled meats, baked potatoes.

Notice the difference?

Now, a few tips I've found to make your baked goods a little bit better.

1) If you're like me, you have probably three or four sets of measuring cups. I personally have a red set with rounded bottoms, a red set with flat bottoms, an old worn down yellow set from college, and a metal set. When you bake, use one set of cups. Don't pick the yellow "cup" and the metal "half cup" and the red with rounded bottoms "third cup." Why? Because the cups aren't necessarily exactly equal. They are calibrated to themselves, not to a universal standard. So stick to the same measuring cups.
2) Or even better yet, measure by weight, not volume. The only problem with this is that 99% of recipes out there right now, particularly the ones that have been in your family for the past 40 years, aren't written in weights.
3) Watch the expiration dates on your baking soda, baking powder, and yeast. Most people think these will keep forever. They don't. Eventually the soda and powder will diminish their leavening capability, and the yeast will die and not rise (yeast is alive, you know). You'll start getting flat cookies, cakes, and bread. No fun. The general rule of thumb is 6 months. Which leads me to...
4) If you don't bake often, buy a smaller container of spices and leaveners like baking powder/soda. I know it is cheaper per ounce to get the bigger containers. But if they spoil or lose their punch before you can get through it, you're still losing money and flavor! So buy the smaller container and finish it off before the garbage can does. Along with this goes knowing yourself and your favorite recipes. If your all time favorite cookie is gingersnaps and you make them once a month, then the big bulk can of ginger might be a better choice than the little one. If you've never tried anise seed and the recipe calls for 1/4 tsp, buy the teensiest one you can manage until you're certain you will use it all.

I think that's enough for today. I'll be posting a few tips about cooking later. Until next time...

3.12.2010

Cooking Basics: Making Breadcrumbs

It's not that my family doesn't like the heel of the bread loaf, it's just that when I'm making sandwiches I prefer the centers. So I usually end up with a few pieces, including the heels, in a package of bread that get discovered when they're a few days stale. Rather than let them go to waste, I make them into bread crumbs! The same process works well for leftover homemade rolls, biscuits, or other breadstuffs (just nothing with extra flavors in it, like muffins or blueberry pancakes. No blueberry breadcrumbs for us, thanks.)

Breadcrumbs

1) Place your leftover bread into an empty bread sack in the freezer, or a Zip-Lock Bag. I like a bread sack because it makes me feel even more thrifty. Keep adding leftover bread to it, over the course of several months.
2) When the bag is full, lay out all the frozen bread things on a cookie sheet (or two). Put in a 300 degree oven for about 1 to 2 hours, or until all the bread is dry and warm to the touch.
3) Let cool for a few minutes. Pulse dried, toasted bread in a blender or food processor until it is crumbs.
4) store in a clean quart jar with an air-tight lid, or in any container with an air-tight lid in the pantry. Use in all kinds of items! (Meatballs/Meatloaf, to top casseroles, as a crust for homemade chicken or fish fingers...the list goes on)

If you like seasoned bread crumbs:

Seasoned Breadcrumbs
3 cups bread crumbs
2 tsp dried garlic powder
2 Tbsp dry Italian Seasoning
1 tsp salt
1 tsp black pepper

Put all ingredients in an air-tight quart jar (with lid on) and shake to combine. Shake well before every use.

3.11.2010

The NEW Basic of Basics line

Lisa's Soap Box:

I am just a regular stay-at-home-mom. I have no formal culinary education. I believe in the power of a good meal, though; the power it has to bring families together and keep them together. I believe that healthy food is the key to emotional, physical, and mental health. I believe that what we put into our body affects what we get out of our body. And I also believe that the importance of a healthy, low-preservative, well-balanced diet is severely underrated in this country. Why is it underrated? Because it has been abused, changed, affected, negotiated, and eventually forced into submission by the convenience age. We buy things because they're easy, not because they're healthy, or cheaper, or tastier. So now I submit: If you learn how easy healthy, good food can be--by learning the Basics of the Basics of Cooking, you'll come to find out what you've been missing by purchasing boxed frozen meals or fast food. You'll be healthier, happier, wealthier, and more self-confident. All it takes is just some learning time--an investment in a much brighter future.

That being said, I am here to help you all through the first few basics. I will be posting, periodically, on this blog, my Basics of Basic Cooking Learning Series. (Henceforth known as "Cooking Basics.") These recipes and tips will be to help you save money, save food, and get more in tune with your kitchen. I hope you enjoy them!

Yours Truly,
Lisa