Showing posts with label Healthy Meal Options. Show all posts

3.03.2012

Fried Rice

It's delicious, fast, and very easy, and a whole meal by itself (or a great side-dish). In other words, this is one of the most versatile recipes out there. I love this fried rice as a lunch, and so do my kids! I make at least a double batch every time I cook it, and we still gobble up the whole pan full. For vegetarian, substitute shrimp for the ham--or just leave it out entirely. This is meant to be a use-up for leftovers, so you can use cooked chicken or any vegetable medley you have on hand.
Ham Fried Rice

1 cup calrose rice, uncooked*
2 cups water*
2 tsp chicken bouillon (optional)*
*OR: 2 cups cooked rice
2 TBSP olive oil
1 cup cubed ham
1 cup frozen peas, frozen peas & carrots, OR frozen vegetable medley
2 eggs
2 TBSP soy sauce
1/4 tsp pepper
1/4 tsp garlic powder

1) Cook rice in a pot or rice cooker with water and chicken bouillon until done, according to package directions. *If using leftover cooked plain rice, omit this step, since--hey! it's already cooked.
2) Heat a large frying pan or wok over medium high heat with olive oil. Add ham and let cook for about 1 minute.
3) Add cooked rice and toss to combine, then let it sit and toast for about 3-5 minutes, turning only occasionally. You want some little brown bits to form, but don't burn it.
4) Add frozen vegetables and toss to combine. Let cook for another couple of minutes until vegetables are hot.
5) Beat eggs with soy sauce, pepper, and garlic in a small bowl.
6) Pour eggs over the cooking rice mixture and stir well for 2 minutes, or until eggs are fully cooked and incorporated (like scrambled eggs).
7) Enjoy! Makes about 4 servings, or if you've got my kids in the household, only 2. :)

Note: if you are making this for someone who needs gluten-free, make sure you check your ham, soy sauce, and bouillon for wheat in the ingredients. All of these things can easily be found GF, but you just need to double check. Also remember that you can always change out the ham for some other type of protein, like edamame or chicken or shrimp to fit your needs.

7.06.2011

"Thai" Peanut Noodles

Fast, easy, delicious, healthy, affordable, and unique. Seriously, what more can you ask for in a meal? (And the "Thai" is in quotes because I made up the recipe myself. It's Thai inspired, but I'm not sure how authentic it really is.)

"Thai" Peanut Noodles

1 lb boneless, skinless chicken breast
3 TBSP olive oil
12 oz linguini
1 bag frozen stir fry vegetables
1/4 cup soy sauce
1/2 cup chunky peanut butter
1 fresh lime
1 TBSP fresh grated ginger (or dried)
1 tsp chopped garlic
1/2 tsp pepper
1/4 cup honey
1 big handful fresh cilantro leaves (optional)

1) Cut the chicken into 1" cubes. Season with pepper and the zest from the lime (grate off the outside green part, but don't go so deep it turns white.) Heat a large skillet or wok. Add oil, and then add the chicken. Let cook for about 2 minutes per side, until lightly browned.
2) Meanwhile, boil a big pot of water. Cook pasta according to package directions.
3) Add the vegetables to the chicken and toss to combine. Let cook on high heat for about 5 minutes, to cook vegetables.
4) Mix together remaining sauce ingredients: Soy sauce, peanut butter, garlic, ginger, lime juice, and honey. It may be a little gloppy.
5) Pour sauce over vegetables and chicken and stir to combine. Reduce heat to medium low and hold it there until the noodles are done cooking.
6) When noodles are done, drain them and toss them in with the peanut sauce, chicken, and vegetables. Sprinkle with fresh cilantro. Enjoy!

Notes:
-For Vegetarian, use frozen, shelled Edamame or even little shrimp.
-For Gluten-Free, use a good rice pasta fettucini.
-Buy your favorite bag of stir fry mix. My favorites have carrots, snow peas, onions, peppers, water chestnuts, and mushrooms. Of course you can chop fresh veggies instead of frozen. I just like the convenience of frozen in this dish.

7.03.2011

Red Pepper Tortellini salad


This pasta salad is unique and delicious--a great way to mix up your summertime barbeque recipes. And because there's no mayonnaise, it can be outside for just a little longer than typical Summer salads (a little... not a lot...).

Red Pepper Tortellini Salad

2 large red peppers (*see note)
3 TBSP balsamic vinegar
1/4 cup extra virgin olive oil
1 package frozen cheese tortellini (about 1 pound)
1 tsp salt
1/2 tsp pepper
1/2 tsp garlic
1/2 tsp fennel seed
1/2 tsp celery seed
8 oz mozzarella cheese
4 green onions
1/2 cup fresh basil leaves

1) Cook tortellini according to package directions. Drain and put in the fridge to cool.
2) Roast the red peppers:
2a) On a hot grill, place washed red peppers. Cook over direct, high heat about 1-2 minutes per side, until the skin blisters and turns black. Cook all sides, so the skin is all black. You might think you burned it, but it is okay.
2b) Place peppers immediately in a paper bag or in a bowl with a lid. Let sit for 10 minutes to steam.
2c) Run peppers under cool water and peel off the blackened skin with your fingers.
2d) using a paring knife, cut the top and seeds out of the peppers.
3) In a blender or food processor, Puree together: roasted red peppers, balsamic vinegar, oil, and seasonings (not the cheese, green onion, or basil).
4) Cube the cheese into small little blocks. Chop green onion and tear basil into pieces.
5) Mix all ingredients in a large bowl (Tortellini, sauce, cheese, onion, and basil). Chill and serve. Makes about 6 servings.

*Note on roasted red peppers: Roasted red peppers can be found jarred in the condiments and olives section of the grocery store. You can use those in this recipe if you don't want to go to the trouble of roasting your own. Also, roasted red peppers on their own are delicious! Try them on hamburgers or along side steak. Chopped, they pair nicely with just about any pasta sauce. Get brave and try them today!

*Another note. This pasta dish could also be served warm, but the cheese cubes may start to melt a bit. You could also add big chunks of cooked sausage or sliced pepperoni and make it a meal. Other things that would go well in this salad: sliced olives, fresh spinach leaves, capers, cherry tomatoes, or sliced radishes. If you don't have enough sauce to cover all your additions, add some extra balsamic vinegar and olive oil. Get creative!

Photo above is salad made with yellow peppers instead of red, and with chopped black olives and Italian Sausage added.

3.27.2011

Vegetable Soup

One of my favorite lunches is a nice bowl of soup with a piece of garlic or cheese toast. After inspecting the ingredients list of my favorite can of vegetable soup, I realized just how simple it really was, and decided to try my hand at it. This big pot of soup was fast and easy to make, and is really cost efficient. When I let my 4 year old son taste test it, I asked him if it needed anything, and he replied, "Yes. Ice." Leftovers can be poured into freezer bags or containers and frozen in the sizes you need for your own lunches, then just warmed and served. Goodbye, canned vegetable soup; hello low-fat, healthy, and delicious homemade Vegetable Soup at a moment's notice!

Vegetable Soup

4 medium potatoes
4 carrots
4 ribs of celery
1 bell pepper (I like red)
1 can kidney beans
1 can garbanzo beans
1 can great northern beans
1 can tomato sauce
1 large can diced tomatoes
4 cups water
1/4 tsp fennel seeds
2 tsp crushed garlic
2 tsp salt
1 tsp pepper
1 tbsp Italian Seasoning
1/2 tsp rosemary
1 bay leaf
1 cup frozen corn

1) Wash and dice the potatoes, carrots (peel first, if desired), celery, and red pepper. Go for a smaller dice, so that they'll be roughly the same size as the beans.
2) Mix together all ingredients except the corn in a 6 quart slow cooker (Crock Pot). Lid it up, then cook on high for 4-6 hours.
3) Stir in corn shortly before eating. Then, enjoy! Remember to freeze the leftovers in smaller portions to make easy lunches.

2.21.2011

Easy Lentil Dip

This easy dip is tasty and high in fiber and protein. Lentils are a great product that will last for months (or years!) on your shelf, but cook up fast. They are a great addition to any food storage, because of their versatility and nutrition.

Lentil Dip

1 cup (dry) lentils
about 4 cups water
8 oz cream cheese (use low-fat!)
1 cup salsa
2 tsp hot sauce
1 tsp salt
1 tsp pepper
1 tsp minced garlic
1 can green chiles
2 cups grated cheddar cheese

1) Rinse the lentils well. Pour into a pan and add the water. Bring to a boil. Cover, reduce heat to a simmer, and boil for 30 minutes. Drain.
2) Pour cooked lentils, cream cheese, salsa, hot sauce, salt, pepper, and garlic into a blender. Blend on high for about 20-30 seconds, or until thick and smooth. You can leave it chunkier if you like. Stir in green chiles.
3) Pour into a crock-pot, or into a baking dish, or even just a microwavable dish. Cover with cheese. Heat until hot through (crock pot: high for about 1 hour, baking dish: 350 for about 30 minutes, microwave: 5-7 minutes on high). Serve with corn chips or in a tortilla. Enjoy!

Note: If you don't have lentils and aren't yet convinced that you should have lentils, you can use 1 big can or 2 small cans of refried beans instead of the cooked lentils. Cooked beans, like pinto, black, kidney, or red, would also be a great substitute for the lentils.

1.05.2011

Homemade Bagels--Tutorial

I've purchased countless bags of bagels at the grocery store. When I really splurge, I buy some from a bakery. The bagged bagels usually go stale before I can eat them all, and even then, they taste... well, bagged. The bakery bagels are expensive too! What's an on-a-budget mom to do? Make your own! Note--The pictures below are of a double batch (16 bagels), and of my favorite filling: chocolate chips.

Homemade Whole Wheat Bagels

3 cups all-purpose flour

1 cup whole wheat flour

1 Tbls sugar

1 1/2 tsps salt

1 Tbls vegetable oil

1 tsp cinnamon

1/2 tsp nutmeg

2 tsps instant yeast

1-1/2 cups of warm water.

Optional Fillings or toppings: Chocolate chips, raisins, blueberries, poppy seeds, sesame seeds, nuts, cheese, etc.

1) Mix all the ingredients in a bowl. Knead for 10 minutes. Then cover with a cloth and let rise for 20 minutes to one hour. (a longer rising time aids in flavor development.)

2) Cut the dough into 8 equal sized balls, (remember my pictures are a double batch)

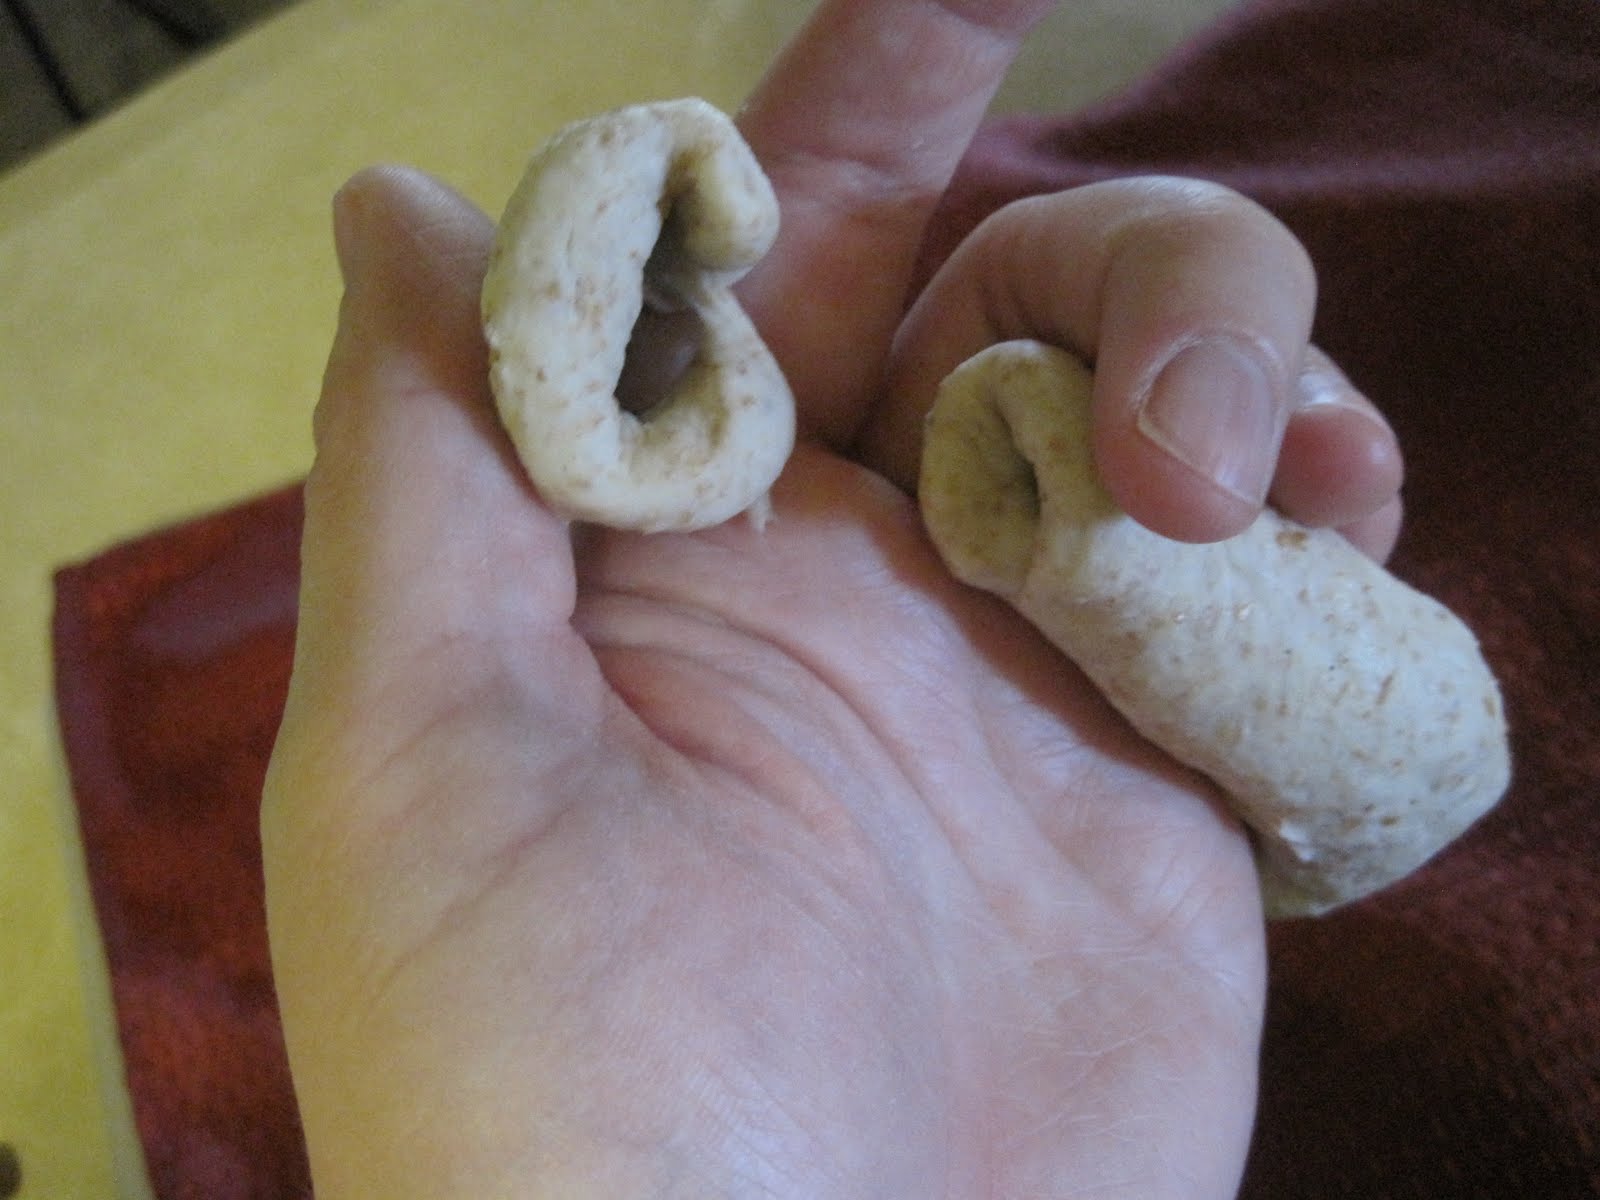
then shape each one into a long snake. * If desired, you can add fillings now--a small handful to each ball. I like to roll mine into a long rectangle, then pour a little line of my fillings right down the middle. Then I pinch the edges together, sealing the filling in a nice tube in the middle of the bagel--ensuring I get a bit of goodness in every bite. I don't add fillings before kneading because the long knead will break them up or squish it strangely.* Keep your dough covered with a damp cloth while working so nothing gets dried out.

When ready, wrap the snake around your hand and clasp the ends together--squishing and kneading until it is a circle. Set each bagel aside, and when done with all eight, cover with a cloth. Let rise for another 20-40 minutes, or until puffy.

3) Pre heat your oven to 425. Bring a pot of water to a boil (wider is better, but it will need to be about four inches deep). Grease a cooking tray well, or better yet, use a silicone baking mat.

4) Boil the bagels! Drop them into the boiling water (it must be boiling, not just hot)--as many as will comfortably fit in the pot and not be stacked. My pot fits 3 at most. Boil for 1 minute per side (time it). When done boiling, move to the tray. *If you want toppings, you can first drop the hot, wet bagel on a plate of toppings.

5) Bake at 425 for 20 minutes, then cool on a cooling rack until you can't possibly stand it anymore! (or about 20 minutes.)

Filling ideas:

-Chocolate Chips (so yummy! The chocolate is all soft on the inside and reduces the need for lots of cream cheese. )

-blueberries

-raisins (add 1 tsp cinnamon to the dough before kneading)

-chopped nuts

-Cheddar or Asiago Cheese *this CAN be added before kneading, about 1/2 cup for the whole batch. Then you can top each bagel after the FIRST HALF of baking with more cheese.

-garlic and herbs for savory bagels

Topping Ideas:

-poppy seeds

-chopped nuts

-cinnamon sugar

-sesame seeds

-sunflower seeds


9.01.2010

The Classic Rigatoni

I cannot claim personal credit for this recipe. It is an old family favorite. I'm mainly putting this up for a friend who wants some freezer meal ideas. This one is great--always a crowd pleaser, very quick and easy to make, and equally easy to make a double or even triple batch as a single--an important quality in a freezer meal, because I can make a huge batch on a normal day and put away a meal or two for later.

The Classic Rigatoni

1 pound rigatoni pasta
1 pound ground beef
1 can tomato soup
1 can *cheddar cheese soup
1 can tomato sauce
2 TBSP Italian Seasoning
2 cups shredded cheddar cheese (if freezing, 3 cups, separated)

1) Cook pasta according to package directions in boiling water. NOTE: if freezing, undercook your pasta by about 2 or 3 minutes. Make sure it is on the firm side of al dente.
2) In a large skillet or saucepan, brown the ground beef.
3) Drain excess liquid from the ground beef and add all remaining ingredients. NOTE: if freezing, set aside the extra cup of cheese for the topping.
4) Mix cooked pasta with the sauce and serve!
5) IF FREEZING: line a 13x9 pan with foil. Spray with cooking spray. Pour in Rigatoni. Sprinkle with 1 cup of cheddar cheese. Freeze until solid. Remove foil pouch from pan and store for long- term. To use: return foil pouch to 13x9 pan and thaw for 1-2 hours on counter. Then cook at 350 until hot and bubbly all the way through. Depending on how thawed the casserole was, this could take any where from 30 minutes to an hour and a half. Enjoy! Serves 6-8 people (big batch... but yummy leftovers.)

*Cheddar cheese soup is in the pasta aisle. If you don't want to use it, you can do this: once the beef is browned, push it to one side of the pan or set aside on a plate. Place 4 TBSP of butter in the pan and let melt. Whisk in 4 TBSP of flour and cook for 1 minute, whisking away any lumps. Then whisk in 2 cups of milk. Bring to a boil to thicken. Add other ingredients as normal, but add an extra 1/2 to 1 cup of cheese.

Notes: You can also make this recipe with ground turkey or chicken, or even chicken cubes. To up the veggie content I've also added chopped onion or grated carrots--both are super yummy! Just add the vegetables with the ground beef at the beginning so they can cook a bit.

8.27.2010

Smoothies: the breakfast and dessert King

I adore making smoothies! They are so delicious, nutritious, and one of the first things I ever got really creative with. With lots of fruit, yogurt, and very little sugar, how can you go wrong? If you are a beginner in the kitchen--or even an expert--making smoothies is a very low-risk way of learning how flavors go together. There's no heat or chopping required--just a good blender.

Super Smoothies

2 cups frozen fruit
1 (6 oz) container yogurt (my favorite is Yoplait Key Lime)
1/2-1 cup of milk, depending on preferred thickness (or if you get really excited, coconut milk)
2 tablespoons sugar or honey (depending on sweetness, I usually taste before adding sugar)

Put all ingredients into a high-powered blender and blend! You might have to pulse a few times until the fruit is broken up. Let whir on high for about 30 seconds to make sure the smoothie is really smooth. Sip slowly to prevent a headache.

Okay, you might have noticed the "frozen fruit." This is the exciting part: it can be any kind of fruit you like! Here's my most successful smoothie fruits:

bananas
raspberries
strawberries
blueberries
peaches
pears

The fruit doesn't necessarily need to be frozen. But by freezing the fruit, the smoothie ends up really really thick and cold, without needing any ice. Ice can make your smoothie watery, which I really don't like. If you're freezing fresh fruit for smoothies, peel them, core them, make sure it's washed. Cut into 1" cubes or so, lay out on a tray lined with wax paper, and freeze. When frozen solid, transfer fruit into bags marked with the date and what it is (you can even portion out your 'smoothie mix') and store back in the freezer for the long haul.

Note--you can make the smoothies even healthier by adding a tablespoon or two of ground flax-seed or other types of protein powder. Some people like to put a handful of spinach leaves in theirs. I've made mine with cucumber in it as part of the fruit, with great success (I didn't freeze the cucumber). Really people, the sky is the limit!

6.09.2010

Fish Tacos

I made these for dinner yesterday and had a semi-unexpected fish-phobic guest join us. Since the fish was already cooked, he tried some skeptically and really liked it. Today this friend heralded me, saying, "You're the best cook in the world! You made fish taste good!" We are definite seafood fans around here, and these tacos didn't disappoint.

Fish Tacos:

Coleslaw--
1/2 small head green cabbage
1/2 head *radicchio
2 carrots
1/2 red pepper
2 green onions

Slice all vegetables very thin, grate carrots, and toss together. Dress with 3 tbsp olive oil, 1 tsp pepper, and 1 tsp salt. Mix well.

Spiced Mayonnaise--
1 cup mayonnaise
1 tsp garlic
1 tsp salt
1 tsp pepper
1 tsp smoked paprika

Mix together, set aside.

Battered Cod--
1 lb fresh cod filets, sliced into 1" wide strips
1 cup biscuit mix
2 eggs
water (enough to thin it out appropriately)
1/2 tsp garlic
1/2 tsp smoked paprika
salt, pepper, garlic, paprika, and flour... a few teaspoons of each.

Heat 2 quarts oil in a heavy bottomed pan or deep fryer until about 375 degrees. Also prepare a pan or plate with paper towels to drain your fish when done.

Mix together biscuit mix, eggs, garlic, and paprika and enough water to make a liquid batter. Set aside. Lay cod strips on a large platter or cutting board. Sprinkle with salt, pepper, more garlic, and paprika, and a generous dusting of flour. Shake off any excess flour, so that it is evenly dusted. Dip seasoned cod in the batter and deep fry in hot oil until golden brown and delicious. Remove from oil and get ready to eat!

If desired, brush your tortillas with butter and toast in a pan briefly before service. Or serve with regular tortillas. Put some of the spiced mayonnaise, coleslaw, and a piece of fried fish in each taco. Squirt with fresh lemon juice. Enjoy!

*Ingredient of the day: Radicchio. It looks a lot like red cabbage, but is smaller. It is actually a red lettuce, and is just a little spicy. Kind of a fun thing to try!

6.07.2010

Grilled BBQ pizza


I used my standard pizza dough recipe, but switched up the cooking method to make a fun new meal: grilled pizza! Here's the instructions for making grilled pizza. The recipes are scattered across this blog, but I've linked them all up.

Grilled BBQ Pizza
1) Make your pizza dough. Here's my favorite recipe.
2) Make your sauce. Since I'm doing a BBQ pizza, I'm using this barbecue sauce.
3) For BBQ chicken:
~ Place five boneless, skinless chicken THIGHS (or 3 breasts) in a bag and cover with 1/2 cup homemade barbecue sauce. Let marinate for 1 hour. Grill over medium high heat for four or five minutes per side, until chicken is done. Cut into strips or chunks.
4) Assemble all ingredients: we like grilled barbecue chicken, sliced mushrooms, sliced red peppers, caramelized onions (sauteed onions cooked for a long time), and lots of white cheese (mozzarella and Monterrey jack combo).
5) Heat up grill to low heat. Roll out a piece of pizza dough. Carefully lay it on the hot grill. Once it's down, you're not going to want to touch it; so be prepared for amorphous blobs of pizza, instead of pretty round ones. It's just impossible to set it down in a nice circle on a hot grill. NO PANS NEEDED! Just lay the dough right on the hot grill!
6) cook for about four minutes, until the bottom of the dough starts to get golden brown grill marks. Remember, LOW heat. Remove dough to a pan, with the cooked part up, the sticky side down.
7) Spread cooked side of dough with sauce, and all desired toppings. Return pizza to grill, lower the lid, and cook for about 10 minutes on low until bottom is golden and crispy, and cheese is totally melted.
8) remove from grill and enjoy!

Tools you will want to have around as you're grilling: A big grill-friendly spatula/pancake turner, a couple pairs of good tongs, hot pads, and some big trays to move food on and off of. Maybe even 2 people to help out.

Homemade Barbecue Sauce

If you've ever looked at the ingredients list on your favorite bottle of BBQ sauce, you might have noticed in the first three ingredients is always at least one (usually two) types of sugar, including High Fructose Corn Syrup. Does it bother any one else that I'm paying four dollars for a sixteen ounce bottle of artificially flavored corn syrup? So after dabbling around a bit, I came up with a highly customizable recipe for Barbecue Sauce, and have vowed off store bought barbecue sauce forever.

Homemade Barbecue Sauce

1 onion
4 slices bacon
1 (big) can chopped or crushed tomatoes
2 tbsp Worcestershire Sauce
2 tbsp Balsamic Vinegar (or Red Wine Vinegar)
1 tsp salt
1/2 tsp pepper
1/2 tsp garlic
1/2 tsp oregano
1 tsp liquid smoke
1/2 cup brown sugar or molasses
~ other optional ingredients: 1/2 tsp red pepper flake, 2 tsp hot sauce, 1 red pepper or jalapeno pepper, 1 tsp cumin, 2 tsp smoked paprika, on and on and on...

1) Chop the bacon into small pieces. Also chop the onion and any other vegetables (grated carrot, red pepper, etc).
2) Cook the bacon in a large skillet until the fat renders out and bacon starts to crisp up. The bacon can stay in the sauce, or be removed for other yummy purposes.
3) Cook the onion/other veggies in the bacon fat for 3 to minutes until it starts to soften.
4) add the canned tomatoes and all other seasoning ingredients. Bring to a boil.
5) taste for seasoning. Add more sugar for sweeter, more vinegar for more tart, hot sauce for heat, liquid smoke for smokiness, until the sauce is the way you like it.
6) simmer until thick; probably about 10 to 20 minutes.

This sauce can be blended up at the end if you want it less chunky. Can be used as a meat marinade, as a topping on burgers or grilled meats. Try pouring 2 cups of BBQ sauce on a pork roast and cooking in the crock pot all day. Then shred the pork and put on hot biscuits for pork sandwiches! The possibilities are endless! See the next recipe on this blog for BBQ grilled pizza.

Ingredient clarification: Liquid Smoke is a product of the smoking process--they actually distill the vapor from hickory smoke and bottle it. It can be purchased in the BBQ sauce/Condiments aisle of your grocery store. A small bottle is all you need, and isn't too expensive. It's really tasty in all kinds of sauces and marinades. However, if you simply don't want to pay three bucks for liquid smoke, you can use smoked paprika (something I would HIGHLY recommend having in your house), or just leave it out. Be sure, though, that you get the real concentrate and not artificial. At my store they were the same price. I checked the ingredients, and one had carmel coloring and artificial flavors, one had hickory smoke concentrate. I'll bet you can guess which one I bought!

4.20.2010

Whipped Coconut Sweet Potatoes

My friend Melanie requested this recipe, so here you go! Sorry I have no picture today. :(

Sweet Potatoes, also known as "Yams" in the United States (though they're not actually yams), are one of the healthiest vegetables on the planet. They're packed with all kinds of wonderful vitamins and minerals, are fat-free, and taste delicious. However, you overcook them, or boil them to death, and they get mushy, bland, and brown. yuck. If all you remember from childhood was the brown and sticky mess covered with burnt marshmallows on Thanksgiving, you should really give sweet potatoes another try--I think you'll be surprised that you really do like them. This recipe is fast and plays on the natural sweetness of sweet potatoes.

Whipped Coconut Sweet Potatoes

2 large sweet potatoes, peeled and cut into 1" pieces
1 can coconut milk
2 tbsp butter
1/4 cup brown sugar
1 tsp salt
1/2 tsp pepper
1/2 cup chopped pecans (optional)

1) If you have a steamer, put the potatoes in that. Fill steamer pot bottom with 1" water and bring to a boil. Put sweet potatoes on top and cook for approximately 20 minutes, until tender. If you do NOT have a steamer, cook in a regular saucepan with about 2" of water on the bottom and covered with a lid. You don't have to cover all the potatoes with water. Just bring to a boil and again, cook for about 20 minutes.
2) Once sweet potatoes are soft and fall apart easily with a fork, drain well. Add other ingredients except for pecans. Mash with a potato masher or whip with an electric mixer. They won't get gooey like regular potatoes, so whip away!
3) Check for seasonings, add more if you like more. Sprinkle on pecans at service time. Enjoy! Serves 4 easy.

3.09.2010

Chicago Style Deep-Dish Pizza


To be honest, I have never eaten true Chicago Deep Dish pizza before. But after watching a Food Network special, I just had to try it. Since I live in Utah and there isn't any available here to buy, I got brave and decided to make my best attempt. I don't know how the "real" stuff tastes, but this was way good! Please note below, however, the times it requires. This is something you have to plan ahead, and give it plenty of baking time. It whets the appetite. :)

For the crust:

"World's Best Pizza Crust"
2 tbsp dry yeast
2 tbsp sugar
2/3 cup warm water
1 tsp salt
2 tsp. sugar
2 cups cold water
3 tbsp oil (I use extra virgin olive for flavor)
1/4 tsp crushed garlic
1/2 tsp. oregano
1 cup corn meal
5-7 cups flour

1) Combine yeast, warm water, and 2 Tbsp sugar; let stand about 5 minutes.
2) In roomy bowl or mixer, combine cold water, oil, sugar, salt, garlic, and oregano until blended. Add the corn meal and then 2 cups of flour, mix well.
3) Add the bloomed yeast mixture, and then the rest of the flour, 1 cup at a time, mixing well, until the dough pulls away from the sides and becomes a cohesive ball. Knead for 10 minutes. kneading is extremely important in pizza crust to achieve that wonderfully chewy texture.
4) Place dough in a large greased bowl and cover with plastic wrap and a lid. Store in the fridge for 1 to 3 DAYS. (This very long rise allows the yeast to actually flavor the dough.)
*Please note this makes enough dough for 2 very large pizzas. If you don't want to make 2, you have several options: keep the dough for a second pizza a few days later, freeze the dough and thaw later for another pizza, prepare a second whole pizza and freeze that, leave out the garlic and oregano and use leftover dough to make something else, like cinnamon sugar crisps.

Chunky Tomato Pizza Sauce
2 of the BIG cans, or 2 quarts homemade diced tomatoes (not the flavored kind, just plain regular
1 onion
1 tsp crushed garlic
1 tsp dry oregano*
1 tsp dry basil*
1 tsp dry thyme*
1/2 tsp fennel seed
2 tsp salt
1 tsp pepper
1 tbsp soy sauce
1 tbsp molasses

1) Heat 3 tbsp olive oil in a large pot. Chop onion fine and add that to the heated oil. Cook for 3 minutes until onion softens.
3) Add the remaining ingredients. Bring to a boil, then reduce heat and cook for 1 to 2 hours, stirring occasionally, until sauce reduces by half and is to desired thickness. Place a lid half way on, or a splatter screen, while reducing, because it can pop a little bit. Cool and store for usage when pizza time comes along.
*ingredients with an asterisk can be replaced with 1 tbsp pizza herb blend, or Italian Seasoning.
and finally....
Chicago-Style Deep Dish Pizza

Chop and assemble your favorite pizza toppings. Here's mine:
Sliced (not shredded) mozzarella cheese AND provolone cheese
1 lb Bulk Mild (or spicy!) Italian sausage (if in the links, remove from casing)--RAW
sliced black olives
chopped bell pepper
sliced, fresh cremini (brown) mushrooms
Also: pizza dough--recipe above
pizza sauce--recipe above

1) Liberally rub the inside of 2 12" cast iron pans with butter.
2) Preheat oven to 400 degrees.
3) Press pizza dough into the pans and up the sides, about half in each pan. (I ound I still had about 3 cups of dough left over, or enough for 1 small pizza). It should end up about 1/4 inch to 1/8 inch thick. It's easier if the dough is room temperature, so remove it from the fridge about 1 hour before assembly time.
4) Think upside-down: layer in sliced mozzarella and provolone cheese on the crust first. Cover the whole surface of the dough with both cheeses. (by putting the cheese on the bottom of the pizza you prevent burning).
5) Press in the raw sausage next, again covering the whole surface in a "disc of sausage" that is about 1/4 inch thick (quite thin)
6) sprinkle in the rest of your toppings.
7) cover the whole top with scoops of the chunky pizza sauce. Top with a little bit of parmesan cheese, if desired.
8) bake at 400 degrees for 1 hour. If your oven can't fit both pizzas on one rack, and you are making 2, then switch racks half way through or even more often than that.
9) When done, let the pizzas sit for about 10 minutes to let the juices cool. Then remove from the pans and to a large cutting board. Dig in!


Editors Notes:
--If you plan on eating at 5, make sure you take the dough out at about 2:30 pm. Start assembling at 3:30 pm. Get the pizzas in the oven at 4. That's about how long it will take you.
--Two large cast iron pans full of pizza is a LOT of pizza. This one recipe, made exactly above, can probably feed 8 or 9 adults dinner, especially if balanced with a salad and dessert.
--Sausage is definitely a traditional Chicago Pizza topping. But if Sausage doesn't float your boat, you can make it with any toppings you like.
--Don't tell anyone that you're making this pizza unless you want them to come over and join you for dinner. Also be cautious of copious amounts of drool.

1.28.2010

Crispy Asian Chicken Fingers; Quick stir-fry veggies


This meal is another one-sauce meal. Make one big batch of the sticky honey-soy sauce, then use it to marinade the meat, flavor the vegetables, and as a dip. This meal is quick to prepare and very kid-friendly. We loved every bite! Oh yes, and I aologize for the picture. But I figure it's better to have a bad picture than none at all.

Honey-Soy Sauce

1 cup honey
1/2 cup soy sauce
1 tsp garlic
1 tsp black pepper
2 tsp ginger (fresh grated, or ground)
1/4 cup ketchup
1 tbsp Worcestershire sauce
1 tbsp Thai Fish sauce (optional)

Mix together all ingredients. Makes about 2 cups.

Crispy Asian Chicken Fingers
1 lb chicken tenders, (OR boneless-skinless-chicken breasts, sliced into 1" slices)
1/2 cup Honey-Soy sauce
2 eggs
1 cup breadcrumbs

1) place the chicken tenders or chicken strips in a flat, shallow pan or a zip-lock bag. Pour on 1/2 cup honey-soy sauce. Please pour, and don't let the rest of your sauce touch the raw chicken. Store the chicken in the fridge for 1/2 hour, up to 3 hours.
2) Take out 2 loaf pans, or other long and shallow containers. In one, crack the 2 eggs and beat. In the other spread the breadcrumbs. Preheat oven to 375. Take out a baking sheet and line with foil, then spray with cooking spray.
3) Dip marinated chicken fingers first in beaten egg, then in breadcrumbs. Lay on baking sheet; don't let touch.
4) Bake at 375 for 25 minutes. Serves 4. (You can very easily make more chicken, though, so serves as many as you like.) Serve with extra honey-soy sauce to dip in.
*Variation: cut your chicken into 1" cubes. Marinate, dredge the same way, but bake for 15-20 minutes. Serve with toothpicks, or pretzel sticks instead of toothpicks. Makes a great little appetizer.

Quick Stir-Fry Veggies
1 red bell pepper
1 head of broccoli
1 can water chestnuts
2 tbsp oil
3 tbsp honey-soy sauce

1) Wash and slice vegetables into bite-size strips, however you like them. (Please note that you can use a variety of vegetables, not just the ones listed above. I also like onions, fresh mushrooms, sugar snap peas, cauliflower, carrots, etc)
2) In a large frying pan, heat the oil for 2 minutes or until it begins to smoke slightly. Add the pepper and broccoli. Let cook, tossing often, for 5 minutes, or until it begins to soften. Add the drained water chestnuts and the honey-soy sauce.
3) Cover vegetables, turn heat to low, and let simmer for about 5 more minutes or until desired done-ness. Serve over cooked white rice, if desired.

and in case you need it...
Plain Good Ol' Cooked Rice

2 cups water
1 cup rice
1/2 tsp salt
(increase as needed with the same ratio)

Mix together water, rice, and salt in a pan with at least 2 inches head room. Bring to a boil. Turn OFF heat and LEAVE ON THE LID. Do not touch the lid. I repeat, do not touch that lid! Let sit, right on the burner, for 30 minutes. If you leave the lid on the whole time, it should be perfect. If you picked up the lid, you're done for. :)

1.19.2010

Rice-A-Roni (But better)

I used this recipe as a demonstration recipe at my cooking class. I like it because it is quick to make (about half an hour start to finish), it is a one-pot meal, and it uses things most of us have on hand all the time.

Rice-a-Roni (but better)

1 cup rice

1 cup spaghetti noodles, broken into 1” long pieces

2 tbsp butter

2 tbsp olive oil

1 onion, chopped

4 cups chicken stock or broth

1 cup frozen peas

2 cups cooked chicken

Salt and Pepper to taste

1. In a large skillet, add the oil and butter. Place over medium-high heat and let the butter melt. Add the chopped onion, rice, and spaghetti noodles (dry). Cook for about 5-8 minutes, or until the noodles are beginning to toast and the onion is soft.

2. Add the chicken stock and stand back—there might be some steam and hissing. Bring to a boil. Cover immediately, reduce heat to medium-low, and let simmer for 15-20 minutes. Check half way to make sure there is still enough liquid in the pan. If it is looking very dry, add 1 cup of water and reduce heat even lower.

3. When the rice and noodles are no longer crunchy, remove the cover and add the peas and chicken. Taste for seasoning and add salt and pepper accordingly.

4. Serve immediately. Makes 4-6 large servings, and this is a complete meal by itself.

*For flavor variations, try adding 1 bell pepper, color of your choice, chopped and cooked along with the onion at the beginning. Also try beef stock instead of chicken, or add any of your favorite frozen vegetables at the end instead of the peas.d

1.18.2010

Smoked Trout; Tahini Pasta Salad


We just ate this amazing meal, and it is ranking in the top 5 best meals I've ever created. The fish was lightly smoked, and the Tahini in the pasta had a nice nutty, distinctive flavor that was unique and beautiful. I understand that smoked fish isn't the easiest, cheapest, or even most convenient of dishes, but if you want to make a special occasion even better, try this most delicious menu!

Smoked Trout

2 pink trout filets (about 1 pound total)
1 tsp ginger (fresh grated is awesome, dry is fine)
2 tbsp soy sauce
1 tbsp worcestershire sauce
1 tsp garlic
1 tsp pepper
2 tsp brown sugar

1) Mix together all ingredients except the trout. Pour the marinade (aka soy sauce mixture) over the trout and put in the refrigerate to soak for 20 minutes to 2 hours.
2) Heat your smoker (can be done on a grill, see note for instructions) to 200 to 300 degrees. Add a hardwood wood chip like oak, maple, apple, or chestnut. Prepare smoker according to the regular directions.
3) Place the fish in the smoker, skin-side down, again according to directions. Smoke for about 1 hour, or until the fish reaches 150 degrees. Serve immediately.

*Note: If you don't have a smoker, never despair! Heat your grill with only one burner on. Prepare yourself a "smoke bomb" by placing a few wood chips in aluminum foil and sealing all edges except for a teensy tiny hole. Remove the grate from above the one burner that is on. Place the smoke bomb directly on that flame, then place the fish on the other side of the grill. Turn the flame down to the lowest level, then keep the lid shut as much as possible. The rest of the directions should be about the same. Please, DO NOT SMOKE INSIDE YOUR HOUSE! NEITHER FISH NOR CIGARETTES!

Tahini Pasta Salad
(*A quick note about Tahini. Tahini paste is a sesame-seed butter, similar to peanut butter, only with sesame seeds. Its flavor is mild and nutty, but it doesn't actually contain nuts. I found it in the olive oil section of my grocery store, but it might be hard to find. If you don't have tahini, or don't feel like buying a big jar for just one thing, you can substitute peanut butter or sunflower butter.)

1 cup shelled edamame (usually in frozen goods)
1 cup whole kernel corn
1/2 cup acini de pepe OR orzo pasta
2 tbsp tahini paste
1 tbsp brown sugar
1 lime, zest and juice
1 tsp salt
1/2 tsp pepper
1 tsp ginger (fresh if you can!)
1/4 cup dry roasted peanuts
3 tbsp olive oil

1) Heat a large pot of water to boiling. Add the pasta and cook until tender, about 8 minutes. Drain when done, but RESERVE 3 tbsp of the cooking water.
2) Mix the pasta, the edamame, corn, and all other ingredients and heat through. *If your edamame or corn was frozen, thaw before putting in the pasta salad. Makes about 2 adult servings, so make more if you need.

To make Gluten-Free substitute cooked rice (brown rice would be phenomenal!) for the pasta, or use a GF pasta.

1.07.2010

Easy Granola Bars


This recipe is quick, easy, and amazingly delicious. I adore cooking foods that are typically store-bought, because I can make them the way I want. I like lots of dried fruit and nuts in my granola bars, but in the store it seems all I can find are chocolate and candy-loaded kind. These bars have lots of whole grains and nutrition packed in every bite.

Granola Bars the Easy Way

6 cups prepared granola
5 cups mini marshmallows
6 tbsp butter
1/4 cup honey
1/4 cup peanut butter
1-3 cups *dried fruit, any kind, chopped
1-3 cups *nuts, any kind
1 tsp ginger
1 tsp cinnamon

1) In a large microwave-safe bowl, put the marshmallows, butter, honey, and peanut butter. Set aside.
2) Mix together the granola, fruit and nuts, and spices in a second even larger bowl.
3) Prepare a large cookie sheet with parchment paper or a non-stick baking mat, or lots of cooking spray.
4) Melt the marshmallow mixture in the microwave for 1 1/2 minutes. Stir. If there is still unmelted butter, give it 30 more seconds. Add to the granola mixture and stir to combine. It will get very sticky and stiff, so make sure you have a good spoon.
5) Spread the granola bars out onto the prepared cookie sheet and chill for at least 15 minutes to set. Cut into pieces and adore. You can individually wrap in parchment or plastic wrap if desired. They will keep for several weeks at room temperature or in the fridge. Makes 20-40 bars, depending on how big you cut them.

*Notes: The nuts and fruit can be modified to anything you like. If you are a chocolate or candy person, feel free to add chocolate chips, coconut, or M&M's. Other variations that would be really good would be to melt a little chocolate and drizzle it over the top when done, or a simple glaze would be good too. If you have a nut allergy, the peanut butter can be completely omitted and the nuts replaced with chocolate, sesame seeds, sunflower seeds, more dried fruit, or just left out.

9.07.2009

Stuffed tomatoes


I went on vacation and came home to find my tomato plants so loaded with red tomatoes that they had knocked over their tomato cages and were lying on the ground. I'll be making salsa later this week, consequently, but today I enjoyed making these tasty stuffed tomatoes. Because store bought tomatoes can be expensive, this might not be something you want to make unless tomatoes are in-season.

Stuffed Tomatoes
4-6 beefsteak tomatoes
2 cups of cooked rice
1/2 lb of ground beef or bulk (no casings) sausage
1 tbsp Worcestershire sauce
1/4 cup chopped onion
1/2 tsp salt
1/2 tsp pepper
1 tbsp soy sauce
2 tbsp brown sugar

Preheat oven to 350. In a skillet, cook the ground beef of sausage with the onion until the meat is browned completely. Turn off the heat and drain off any excess liquid. Add everything but the tomatoes and stir to combine. Set meat mixture aside.

Take your tomatoes and cut off the tops. If they roll around a lot, you can also cut a shallow slice from the bottom to stabilize. Take a spoon or a knife and gently cut out the seeds from the inside, leaving the sides about 1/2 inch thick. Stuff the now hollow tomatoes with the meat mixture. Place stuffed tomatoes in a baking dish and bake at 350 for 20 minutes, or until the outside of the tomato is wilted and they are hot completely through. Serve as a complete meal, garnished with shredded basil leaves, if desired.

Variations: You can stuff nearly any vegetable with the same meat mixture listed above. Hollowed out peppers, acorn squash, zucchini, or eggplant would be fantastic here. You will need to modify the cooking time. Peppers are about the same, but squash and eggplant need to be cooked until they are soft. Cover the dish in foil first, and then bake for about an hour or even longer, until a knife inserted in the flesh of the vegetable is soft. If you want to get even more adventurous, try stuffing apples. Make the same mixture, but make sure you use sausage. Then hollow out your apples just like the tomatoes and bake them for about an hour, again until they are soft.
You can also try topping the stuffed tomatoes with cheese before they bake.

Note: This makes a lot of the meat mixture, so you can save leftovers the freezer or the fridge for a different dinner. I've found that filling vegetables with yummy stuff is a fun way to get your family to eat more healthy foods.

8.11.2009

Amazingly Easy Fish Recipe

My friend Lydia requested this recipe, and it is a good one for the summer especially. I use this recipe for nearly any type of fish, any size, any shape, and it always comes out beautifully.

Fish-in-a-pouch

Fish, any type (for starters try trout or salmon; they are very mild)
a handful of fresh basil, parsley, or oregano (or 1 or 2 tsp dry)
1 tbsp butter
salt and pepper to taste
1 lemon, sliced

1) Make sure your fish is cleaned and if you like, filleted or boned. When cooking a whole fish, it is often much easier to remove the bones when it is done than before, so I typically keep my fish whole. You may remove the head and fins if you like, but it isn't necessary.

2) On a large piece of aluminum foil, place the fish. Stuff the cavity, or just lay on top, all the herbs, butter, and seasonings. Top with pretty slices of lemon.

3) Fold and Seal up the aluminum foil so that no juices can get out.

4) Bake in a 350 degree oven for 15-30 minutes. Timing here is hard to guess, because it greatly varies between fish types and sizes. You're looking for the fish to be opaque all the way through and a little flaky. Temperature to shoot for is about 150-160 degrees. You can also put your pouch on the grill if you prefer. Start checking when you start smelling the fish. If you have no sense of smell, start checking after about 15 minutes, or less, if the oven temp is hotter.

5) Serve with more fresh lemon slices to squirt over the fish.


This recipe is fantastic because it is virtually fool-proof. By cooking the fish in the pouch, it prevents any sticking, reduces the risk of over cooking, and can be done anywhere--in the oven, on the grill, or even in a campfire. You can get really creative with the herbs you put in your pouch, and can really change things up by adding cherry tomatoes or other vegetables like asparagus.

8.03.2009

Ratatouille and French Bread

A quick trip to foreign flavors can really amp up your culinary portfolio. I know I've mentioned it before, but this will be one for Lisa's Soap Box. Don't be afraid of new flavors! You may find dishes from far-away places that become your favorites. Children that are introduced to new flavors, paired with more familiar ones, and are encouraged to taste everything on their plates, are far less likely to be picky eaters. Also, by adding a new flavor or cooking method, you can explore the options healthy meals offer. Try it; when you find new dishes and new ingredients you like, you won't be disappointed.

This easy meal from France is sure to be a huge hit with the kids, especially if you've watched Disney's "Ratatouille." Make it into a family date night; make the meal, watch the movie, and you're sure to have a great time. These two recipes are very simple, though the bread takes time to rise. Make sure you start it early enough in the evening so that it has plenty of time to rise, and then cook it so that you've got hot, fresh bread for dinner. There is nothing better in the world.

Ratatouille
1/4 cup olive oil--more may be necessary as you cook
1 large yellow onion
1 tbsp fresh thyme leaves
1 tsp salt
1 tsp pepper
1 medium sized eggplant
1 zucchini
1 tsp garlic
1 large red or green bell pepper
1 tbsp fresh parsley
1 can stewed or crushed tomatoes
1/2 cup cherry tomatoes
2 tbsp fresh basil leaves
a splash of balsamic vinegar

1) Chop all your vegetables into roughly 1/2" cubes. This includes halving all the cherry tomatoes. If you are fast with your knife, you may be able to do this during the cooking process, but if you're unsure, it's best to at least give yourself a head start.
2) Heat a large skillet or a heavy-bottomed sauce pan over medium-high heat with the olive oil.
3) Cook everything in the order listed above. Whenever a seasoning comes after a vegetable, add the seasoning with that vegetable. Stir well after each addition, and let it cook for about 2-4 minutes between each vegetable.
4) The last is of course the cherry tomatoes, basil, and balsamic vinegar. Once those are in, stir just to heat through for about 30 seconds, and serve.


French Bread
2 cups warm water
2 tbsp yeast
1 tbsp sugar
1 tbsp olive oil
2 cups whole wheat flour
3-4 cups all purpose flour (probably closer to 3)

1)Mix the first 5 ingredients together in a kitchen mixer, or by hand. Mix really well.
2) Add the AP flour 1 cup at a time, mixing between each cup, until the dough is fairly stiff and pulls completely clean from the side of the bowl.
3) Knead in the mixer, or by hand, for 8-10 minutes.
4) Place dough into a greased bowl (with olive oil, butter, shortening, or cooking spray) and cover with a slightly damp towel. Let rise for 1-2 hours.
5) Cut the dough in half and shape each half into a log. You can do this by rolling it out into a rectangle or oval shape and then rolling it up and pinching the ends over, so that it is a long shape. Place onto a cookie sheet that has been sprinkled with a little cornmeal. Use a sharp knife to cut about 3 diagonal slits on top. Brush the top with a little bit of olive oil or a basic egg wash (1 egg beaten with 1 tbsp water). Cover the loaves again with the towel and rise for another 1/2 to 1 hour.
6) Pre-heat oven to 375 degrees. Bake the bread for 35-40 minutes. When it is done, you can tap the bread with your finger and it will sound hollow. After baking, remove the loaves of french bread onto a cooling rack.

Ratatouille is good served over pasta. Also try adding other vegetables, mushrooms, or even sausage. Of course you know what to do with leftover french bread. These two together make a fantastic, French-inspired meal that is vegetarian, low-fat, and super healthy.